|
|||||
| Overview Download UserGuide Troubleshoot Conditions ChangeLog | |||||
|
Using Pebbles ProgramsUpdated for Pebbles v6.1 
Installation InstructionsInstalling on the PC
Installing on a Palm
Next, see Connecting a PalmOS device to the PC. Installing on a Windows CE or Pocket PC Device
Next, see Connecting a PocketPC device to the PC. Connecting a PalmOS Device to the PC
Using a Serial/USB Port
Using a Network ConnectionFor a network connection, your PDA must be connected to some kind of network device. For example, the Tungsten C supports Wi-Fi (802.11). We also support Symbol Technologies Palm computers that use Symbol's wireless network. To use the network connection, you need to enter the IP address of your PC computer. Sorry, we don't support names yet, so you need to know the number. It is usually a number of the form nnn.nnn.nnn.nnn. The number is displayed at the bottom right of the PebblesPC window on the PC. When you initiate the first network connection with PebblesPC, it will pop up a dialog on the PC to confirm the connection. This provides some minimal security. See more information on Network Connections below. Using BlueToothPebbles version 6 supports BlueTooth devices such as the Tungsten T. Just select the BlueTooth option in the connection dialog box. See the instructions below about setting up the PC side of the BlueTooth connection through a serial port. To make the connection work best, the PC and the PDA should be "paired", which allows the PDA to connect to the PC without requiring a login sequence with a PIN number each time. Under WindowsXP with the TDK BlueTooth drivers, for example, setting up a pairing is an option in the ":BlueTooth Setup Wizard". See the Trouble Shooting Guide and FAQ if you are having problems connecting. Using InfraredWe removed the Infrared connection option from Pebbles version 6 for PalmOS. We had found that Infrared does NOT work very well: the range is quite limited, the PDA has to be carefully aimed at the PC's Infrared receiver, and there is interference when multiple PDAs try to connect at the same time. Also, on the PC side, you have to turn off IRDA support and use raw IR, but we have not been able to figure out how to do this on any current version of Windows. Connecting a PocketPC Device to the PC
Using ActiveSyncMost people will want to use ActiveSync as their method of connection. This works whether the PocketPC is in the cradle, using BlueTooth or using a Network Connection. First, start an ActiveSync session between the PocketPC and the PC. For example, putting the PocketPC in its cradle while it is turned on will automatically start ActiveSync. Or you can start a BlueTooth or Network ActiveSync session. You should hear the ActiveSync tones from both the PC and the PocketPC.
The PC-side of PebblesPC should then pop up a dialog on the PC to confirm the connection. This provides some minimal security. See more information on Network Connections below. Using a Serial PortIf you want to connect the PocketPC to the PC using the serial or USB port, the best way is to use ActiveSync, as described above. If you don't want to do this, it also works to turn off ActiveSync, but only if you have a serial cable or cradle. If you have a USB cable or cradle, the only way to connect to Pebbles is through ActiveSync. To connect using a serial cable without using ActiveSync, in the ActiveSync program, go to "Connection Settings" and disable ActiveSync from looking at the COM port that your PocketPC is on (usually COM1). Then, in the PocketPC's connection settings, choose Serial and set the COM device to 1. Using a Network ConnectionIf your PocketPC has a built-in network (such as a Wi-Fi capability like most current iPaqs), then you can connect directly to the PC using the network. Simply select the network option in the Options dialog, and enter the IP address of the PC. Sorry, we don't support names yet, so you need to know the number. It is usually a number of the form nnn.nnn.nnn.nnn. The number is displayed at the bottom right of the PebblesPC window on the PC. When you initiate the first network connection with PebblesPC, it will pop up a dialog on the PC to confirm the connection. This provides some minimal security. See more information on Network Connections below. Using BlueToothThe best way to connect a PocketPC to a PC using BlueTooth is using ActiveSync. For example, you can use the BlueTooth Manager on the PocketPC, and use "New" to create an "ActiveSync via BlueTooth" connection with your PC. Then follow the instructions above about using Pebbles through ActiveSync. Alternatively, if this doesn't work for some reason, you can use the BlueTooth directly. BlueTooth appears to both the PocketPC and the PC as serial ports. The Options dialog on the PocketPC lets you enter the serial port that BlueTooth is providing (usually COM 4 or COM 6) and similarly, you can add the COM port to PebblesPC that your PC-side BlueTooth software is using (usually COM 4). On the PC side, be sure to disable ActiveSync's use of the BlueTooth COM port. You can do this by File / Connection Settings... dialog, and unchecking the first option ("Allow serial cable or infrared connection to this COM port:"). Note what COM port is there (usually COM 4) and then add this COM port to PebblesPC so it will listen to the BlueTooth COM port. See the instructions below for more about setting up the PC side of the BlueTooth connection through a serial port. On the PocketPC side, to find the correct PocketPC COM port, turn on BlueTooth, tap on the BlueTooth icon (at the bottom of the Today screen), and select "BlueTooth Settings" (or else select Settings from Startup, and find BlueTooth under the System tab). One of the tabs at the bottom of the BlueTooth Settings should be "Serial Port". Make sure the "Enable Service" check box is selected. Note what port is used for "Outbound COM Port". Go to the "Options" dialong on the application on the PocketPC (for example, the Remote Commander window is shown above), and select the Serial Port radio button, and type this number into the text box. When you hit OK, it should ask for which device to connect to, and select your PC. Note: it seems that for some reason, using BlueTooth directly as COM ports in Pebbles on both ends is slower than using ActiveSync through BlueTooth on the same devices! Using InfraredThere is an option for connecting the PocketPC to Pebbles using Infrared, but this probably doesn't work on the PC side. We had found that Infrared does NOT work very well: the range is quite limited, the PDA has to be carefully aimed at the PC's Infrared receiver, and there is interference when multiple PDAs try to connect at the same time. Also, on the PC side, you have to turn off IRDA support and use raw IR, but we have not been able to figure out how to do this on any current version of Windows. See the Trouble Shooting Guide and FAQ if you are having problems connecting. How to Use PebblesPCThe PC Side: PebblesPC and its DLLsThe PC side of the Pebbles software is organized as a main program, called PebblesPC, and a set of dynamic linked libraries (DLLs) that are run as needed. PebblesPC controls all the Pebbles users connected to a single machine, and all their applications. Each Pebbles PDA application has an associated DLL on the PC. The main PebblesPC program automatically switches to the appropriate DLL for each user as they switch applications on the PDA. PebblesPC finds the DLLs by looking in the same directory as PebblesPC is stored in, so all the Pebbles DLL files must be in the same directory as PebblesPC.exe.
The first option at the bottom will automatically start PebblesPC when PowerPoint
starts. By default, (if you have the Palm software installed) PebblesPC will close the Palm HotSync program if it is running and open the COM port that HotSync uses. The checkboxes at the bottom of the main PebblesPC window allows you to control whether it closes HotSync or not. If PebblesPC closes HotSync when it starts, then HotSync will be automatically restarted when PebblesPC quits. (Note: For PocketPC, you usually want to leave ActiveSync running, so you can connect to PebblesPC using ActiveSync.) COM PortsThe main PebblesPC window shows which COM ports and network connections it is controlling. Typically, you will only need one COM port, usually COM1 for the regular PC serial port, or COM 4 for the COM port used by a BlueTooth connection. Most desktop PCs also have COM2. You can add and delete COM ports using the buttons. If the COM port is being used by another process (like the HotSync Manager), PebblesPC will give an error message. Check that you have the right COM port number, or if another program is using the COM port, you have to exit that program first. Then hit OK on the PebblesPC error dialog. If you are only going to connect to PebblesPC using ActiveSync or using a network, then you don't need to add any COM ports. Each line also shows which plug-in (which application) and which user each connection is using, if any. Network Connections on PC SideConnections using a network socket are automatically listed when the connection starts. There is no need to Add Port for network connections. However, when a network connection is initiated, PebblesPC will ask to confirm the connection. This provides some protection against people taking over your PC using the Pebbles protocol over the network. However, this is pretty minimal security, so you have to be careful. WARNING: There is little security in Pebbles, so enabling network connections in PebblesPC can allow anyone anywhere on the Internet to control your computer by typing in the appropriate IP address. If you have Windows XP Service Pack 2 installed, then you have Windows XP Firewall, which may want to block the PebblesPC communication. You should enable this. Windows XP may ask if it is OK when PebblesPC is first run, or else you may have to reconfigure it afterwards by opening the networks connections window from the Start menu (or from the Settings menu) and going to properties of the network connection, and clicking the advanced tab to enable communication over port 4343 which PebblesPC uses. PebblesPC ButtonsIn summary, the buttons in the PebblesPC window are as follows:
See the pages about the specific pebbles applications that describe what they do. Advanced Features of PebblesPCAs an advanced feature, PebblesPC can be started with command line arguments. Each argument specifies a port to open with an optional username to assign to it: PebblesPC [user@]port [user@]port ... If "user@" is omitted from the Nth argument, the username is assumed to be "UserN". For example: PebblesPC Rob@1 Brad@4 5 John@6 would open COM1 as "Rob", COM4 as "Brad", COM5 as "User3", and COM6 as "John". As another advanced feature, PebblesPC will make an ever-growing transcript of all the traffic for each user. This is intended for debugging the protocol. The files are put into the same directory as PebblesPC.exe and are named with the port name or IP number. Start logging using: PebblesPC -l PebblesPC and Installagent's SlideShow Commander
Although based on our code, the Installigent version is not compatible with the CMU software. Therefore, do not run PebblesPC on the PC at the same time as Installigent's SlideShow Commander program for the PC (see below). CMU's Pebbles applications will not talk to Installigent's SlideShow Commander program for the PC, and Installigent's SlideShow Commander for Palm or PocketPC will not talk to PebblesPC. If you have both Installigent and CMU programs on your handheld, you will have to switch the PC application appropriately based on whichever program you are running on the handheld. For example, run PebblesPC on the PC when you are running Pebbles RemoteCommander, but then quit PebblesPC and start Installigent's SlideShow Commander program on the PC when you want to start using Installigent's SlideShow Commander for the Palm. 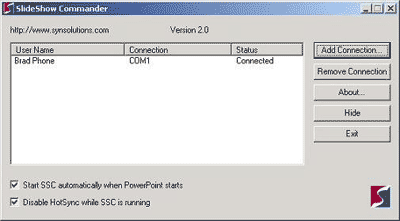
|
||||
|
Copyright © 2009 Carnegie
Mellon University
Maintained by Brad Myers Site designed and developed by Htet Htet Aung |
|||||

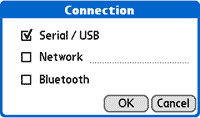 To
use a PalmOS device with a PC, they need to be connected. The Pebbles programs
allow
you to connect in three ways from the "Connection..." dialog box
(see picture at right), which is built into all Pebbles applications. For
most Pebbles Palm applications, it
is available from a top level "Options" menu.
To
use a PalmOS device with a PC, they need to be connected. The Pebbles programs
allow
you to connect in three ways from the "Connection..." dialog box
(see picture at right), which is built into all Pebbles applications. For
most Pebbles Palm applications, it
is available from a top level "Options" menu.
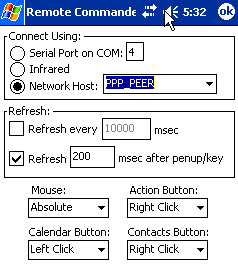 To
use the PDA with a PC, they need to be connected. The Pebbles programs allow
you to connect in three different ways from a PocketPC to the PC. For most
Pocket PC/Windows CE Pebbles applications, the connection options are displayed
as part of the "Options / Options..." dialog box (picture shown at
right).
To
use the PDA with a PC, they need to be connected. The Pebbles programs allow
you to connect in three different ways from a PocketPC to the PC. For most
Pocket PC/Windows CE Pebbles applications, the connection options are displayed
as part of the "Options / Options..." dialog box (picture shown at
right).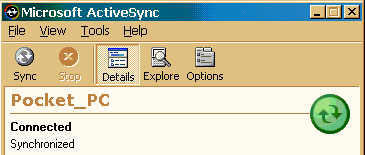 Next, you would use the IP number 192.168.55.100 or the special name "PPP_PEER" in the PocketPC's
connection dialog box, as shown here. This is the IP number and name that ActiveSync
uses to
recognize the PC to which the PocketPC is attached. (You can alternatively use the IP number of the
connected PC if you want). Note that when connecting to the PC using the
ActiveSync method, you use the "Network Host" option on the Pebbles
connection
dialog, even if you are connecting using the cradle.
Next, you would use the IP number 192.168.55.100 or the special name "PPP_PEER" in the PocketPC's
connection dialog box, as shown here. This is the IP number and name that ActiveSync
uses to
recognize the PC to which the PocketPC is attached. (You can alternatively use the IP number of the
connected PC if you want). Note that when connecting to the PC using the
ActiveSync method, you use the "Network Host" option on the Pebbles
connection
dialog, even if you are connecting using the cradle.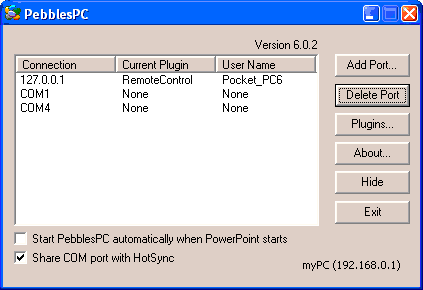 This is only useful if you have the CMU version of SlideShow Commander,
which is not generally distributed.
This is only useful if you have the CMU version of SlideShow Commander,
which is not generally distributed.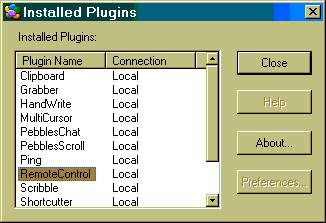 Plugins:
Brings up the dialog box shown at right that lists all the plugins (DLLs)
that were found in the same directory as the PebblesPC program. You can click
on a plugin to select it, and if that plugin has an "About" box,
help or Preferences, then those buttons will be ungreyed.
Plugins:
Brings up the dialog box shown at right that lists all the plugins (DLLs)
that were found in the same directory as the PebblesPC program. You can click
on a plugin to select it, and if that plugin has an "About" box,
help or Preferences, then those buttons will be ungreyed.