|
|||||||
| Overview Download PalmGuide PocketPCGuide | |||||||
|
Palm User Guide
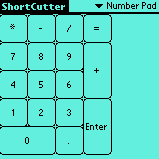
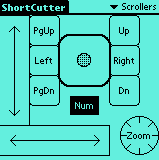
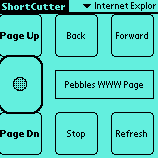
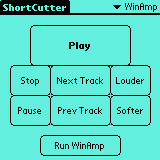
PanelsEach screen-full of controls is called a "panel". The user can create many different panels to control different applications. Panels can also be renamed and deleted. The panel menu at the top-right of the Shortcutter screen shows the currently displayed panel, and the list of other panels. When in edit mode, the "Panel" menu has items for creating, renaming and deleting panels, and you can also use the bottom item in the panel menu to add, rename, or delete panels. Shortcutter stores each panel in a different database on the Palm. This means that when you hotsync, each Shortcutter database will be stored in a different file on the PC. The name of the file is the name of your panel, prefixed with "Shortcutter_". For example, the "Main" panel becomes the file "Shortcutter_Main.PDB" which is put into your regular backup directory. This makes it easy to share and distribute panels of controls. You can select any of the PDB files and load them onto the Palm like any .PRC file, and then the next time you run Shortcutter, it will load in these new panels. For example, in the distribution of Shortcutter, we have included some sample panels (see pictures below):
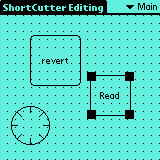
If you make some nice panels either for a particular application, or for applications in general, please email them to pebbles@cs.cmu.edu so we can see what you have made, and share them with others. Creating and Editing Widgets When in edit mode, you can create panels, add new buttons and other widgets to the panels, set their properties, move them around, delete them, etc. The screen shows a pattern of dots to show you are in edit mode. Note that the dots do not align with the grid; they are just to show that you are editing. Creating WidgetsTo create a button or other widget in edit mode, simply put the stylus at the top left of where you want the widget to go, and drag to the bottom right. The button must be of a big-enough size, or nothing will be created (just tapping won't create a button -- you have to drag towards the bottom right). After the button is created, the "Item Properties" screen will immediately appear to allow you to name the button and set its appearance and properties. If you hit OK, the button will be created, and if you hit Cancel, the button will not be created. General Properties Button-style widgets allow you to set the Appearance of the widget. Current choices are "Rounded Rect", regular "Rectangle" or "No Border", and a checkbox determines whether it is Filled or not (black with white text or white with black text). EditingThe Shortcutter uses a standard direct manipulation drawing editor style of manipulation. The selected widget is shown with four black squares at its corners (the button "Read" is selected in the picture above). Tap on a widget to select it. Tap where there is no widget (in the background) to make there be no selection. You can drag in the center of the widget to move it and drag on a square to resize the widget. For small widgets, it might be easier to press and drag with the stylus rather than tapping and then trying to drag from the center since the widget might be covered by the selection handles. The selected widget can be deleted using the menu command Edit / Delete. (The menu commands Cut, Copy and Paste are not implemented yet, sorry.) Undo is supported for creating, moving and deleting widgets (but not yet for changing properties or deleting a panel). You can get back to the properties form shown when the widget was created using the Edit / Properties menu item or by double tapping on a widget. GriddingThe size and position of the widgets is controlled by the current Gridding amount, which is set with the Options / Set Grid form. The default is 10 x 10 pixels. The grid also determines the minimum size object, and where the widgets are placed. The screen is 160 x 160 pixels in size, and the Shortcutter header is 16 pixels tall. Note that the dots in edit mode do not correspond to the grid amount. Warning!Shortcutter keeps all edits in memory, not in the database, while you are editing. Therefore, if Shortcutter crashes, all the edits are lost (like a regular PC program, but unlike most other Palm programs). The edits are saved to the database only when you exit Shortcutter, by switching to another application. Shortcutter has a few bugs that may cause it to crash while editing (like it can run out of memory). Therefore, you should exit Shortcutter frequently to save your work. Note that after leaving and returning, the undo history is gone, but at least all your widgets are safe in databases, and will be backed up at your next Hotsync. Types of Widgets
Widget ActionsEach of the widgets supports one or more actions, which occur when you invoke the widget. The currently supported actions are:
Send String - This will send a whole string to the PC as if it was typed at the PC's keyboard. This might be useful for creating abbreviations or any other longer string to be sent. This only supports sending alphanumeric characters, though. You currently cannot include special characters or control characters in the string. Menu items for Cut, Copy and Paste are available during type-in so you can transfer text from other Palm applications. Scroll Button - This pops up a list of various scrolling actions. When the button is invoked at run-time, the corresponding scrolling action will be sent to the PC. Note that this sends a Windows scroll event to the application, and many applications do not support these scrolling actions, so if nothing happens, you might try a different event. Also, note that scroll pagedown and key page down are different: the scroll page down uses the special scroll windows message whereas the key just sends the keyboard key labeled page down. Mouse Button - This allows the Shortcutter widget to pretend to be the PC's mouse buttons. You can control whether the Left, Middle, or Right mouse button is sent, and then set modifiers for whether to send a double click, and whether it should be modified by Shift, Ctrl and/or Alt. You should make sure the "Control" option matches that for the MousePad widget. Usually, you will want "Mouse" to press the button for the "real" mouse. Scribble will allow control of drawing if the MousePad is in Scribble mode as well. Similarly with MultiCursor. Switch Panel - This action switches to a different Shortcutter panel. Unlike all the other actions, it does not send anything to the PC, but just changes the state on the Palm itself. The list of currently defined panels is presented. Macro - This allows a sequence of the other actions to be sent to the PC. See the full explanation for Macros below. PC Menu / Tool Item - Many PC commands you might want to invoke do not have a keyboard shortcut. This action tries to allow you to invoke them using a Windows hack. Most PC menu and toolbar actions use a special Windows message to notify the application of what was hit. The PC Menu / Tool Item action tries to capture this command then send it to the PC as if the menu item or toolbar had been hit. To use this action, you click on the Record button on the Shortcutter form, then invoke the desired menu item or toolbar button on the PC. If it works, Shortcutter will beep and display a command number. Since these command numbers are pretty meaningless, you can type in a Description of what the command does, so you can remember later. At run time, this command number will be sent to the PC. Note that even if the recording works, sometimes applications do not respond to the command number in the expected manner. Application Specific - This kind of action will do a different action depending on which application is running on the PC. There can be up to three different actions, with an optional default ("otherwise") action. Any of the choices can be blank. The application name for the "when" part must match exactly, so it is best to use the "Load from current PC application" button to make sure the string names are identical. Auto-Repeat and SilentFor some widgets, such as the buttons, you can choose whether the action will "Auto-Repeat", which means that the action repeats if you continue to press on the button. (You can see the check box for Auto-Repeat and Silent on the "Open" screen above.) There is a short delay before the repeating begins. If you move outside of the button while pressing, the repeat action stops. If the auto-repeat check box is not checked, the the action happens once each time you press the button. You can also choose "Silent" which means the action doesn't emit a click on the Palm when you select the button (see the Run Mode section). Note that although Silent is on the action form, it actually applies to the entire widget, so making one action of a multi-action widget (like a knob) silent will also make all the actions of that widget be silent. Macros The main screen for macros allow you to type a description of the macro. This can be used to remind you what the macro will do, and it is what is displayed on the Palm as feedback when the macro is invoked.
You can edit or delete the selected step using the buttons at the bottom. (As a shortcut to editing a step, if you click on the step number, it will select it and then immediately start editing.) You can specify that step's action using the regular dialog boxes. The arrows in the center bottom allow you to re-order the steps of the macro by changing the position of the selected step. If there are more than 9 steps, then the scroll bar appears and you can scroll by tapping on the scroll bar or by using the physical up-down buttons (note: not the arrow icons on the screen, which reorder the steps). Hit the OK button for the edits to go into effect, or hit Cancel to ignore the edits. Unfortunately, editing of macros is not undo-able, but you can hit cancel to abort the edits and start over. Device ControlNew in version 5 is a program that can be used to control Proxima projectors and X-10 devices which are connected to a serial port of your computer. (If you have other devices connected to the serial port that you want to control, let us know.) The devicectl.exe program is included in the standard Pebbles download, and by default ends up in the same directory as PebblesPC.exe. You can list devicectl.exe in the Open action with the parameters that will cause devicectl to send commands to the various devices. The syntax for devicectl is:
The first parameter to devicectl must be "-com N" where the N is replaced by the serial COM port that the device is plugged into. For example, if your projector is plugged into the COM 2 port, you would use "-com 2". The next parameter is whether to control a Proxima projector or an ActiveHome X10 device. This is specified using "-proxima" or "-x10". For a Proxima projector, you would then include the appropriate code for the projector. Contact Proxima to get the appropriate codes. For example, the following code will turn on my Proxima projector:
For X10, you give the house code number, then the device code number, and then one of the following commands:
For example, the following will turn the device numbered A2 off, where the X10 device is plugged into the COM2 port of the computer.
Application Buttons Sending Graffiti Unfortunately, we don't yet support the pop-up keyboard from the Graffiti "abc" area like RemoteCmd. Another feature we were thinking of adding eventually is the ability to map a Graffiti stroke to an arbitrary Shortcutter action, but this also isn't available yet. Run ModeWhen you switch to Run Mode, then all the buttons and other widgets perform their assigned actions. The dots on the screen are removed in run mode, so it is easy to tell. When the actions operate successfully, then a beep is sounded. This means that the Palm and the PC are correctly connected together, PebblesPC is running on the PC handling the correct serial (COM) port, PebblesPC found the appropriate Pebbles plug in on the PC, and the command was successfully sent to the plug in. If there is silence, then either the sounds for the Palm were turned off globally in the Palm preference dialog, the sound for that button was turned off by setting its action to be silent, or else the command didn't get sent to the PC. If there is no action (action type "<None>") for the widget, there will also be no sound. Feedback for ActionsIn run mode, by default, each action that is performed provides feedback to show what it is doing. This is displayed as a one-line text string containing the kind of command and then the value. The string goes away when the button is released, or on the next command. You can turn off the display of this feedback using the "Show Action Names" item in the Global Preferences dialog box. Global PreferencesVersion 4 of Shortcutter introduced a global preferences dialog box. This has check boxes for controlling the feedback for actions, and for controlling whether the Palm powers off when Shortcutter is running. Be careful if you un-check this box that the Palm doesn't run out of battery! The next buttons provide access to the preferences for Application Keys and for Graffiti (which are also available directly from menus in Edit mode). Summary of Menu ItemsEdit ModeEdit menu:
Options menu:
Panels menu:
Run ModeOptions menu:
Known Problems and Bugs
|
||||||
|
Copyright © 2009 Carnegie
Mellon University
Maintained by Brad Myers Site designed and developed by Htet Htet Aung |
|||||||

 Shortcutter
has two global modes: Editing and Running. You can switch using the menu commands
Edit / Switch to Run Mode and Options / Switch to Edit Mode. Both have the same
accelerator: Command T.
Shortcutter
has two global modes: Editing and Running. You can switch using the menu commands
Edit / Switch to Run Mode and Options / Switch to Edit Mode. Both have the same
accelerator: Command T. 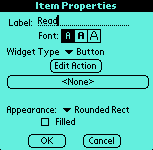 The
label of the widget is displayed for most kinds of widgets. You can also select
the font in which the label is displayed. The next item is the widget type.
The various types are discussed below. Depending on the type, you can then set
the actions associated with the widget.
The
label of the widget is displayed for most kinds of widgets. You can also select
the font in which the label is displayed. The next item is the widget type.
The various types are discussed below. Depending on the type, you can then set
the actions associated with the widget.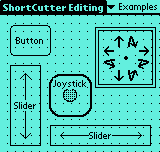 The
first choice to make when creating a control is which kind of widget it should
be. The choices are as follows (see picture at right):
The
first choice to make when creating a control is which kind of widget it should
be. The choices are as follows (see picture at right): 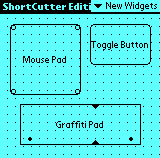 Mouse
Pad - This supports controlling the PC's cursor in the same way as
the Pebbles RemoteControl, Scribble and MultiCursor applications. You get
to choose whether the mouse pad widget controls the real mouse (like
Mouse
Pad - This supports controlling the PC's cursor in the same way as
the Pebbles RemoteControl, Scribble and MultiCursor applications. You get
to choose whether the mouse pad widget controls the real mouse (like 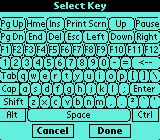 Key
- This sends a single keystroke to the PC. Selecting this action pops up the
Select Key form which contains all the PC's keys, including the function keys.
Note that the modifiers like Alt, Ctrl and Shift are available as well. To send
Ctrl-Shift-F1 from a Shortcutter button, simply select the Ctrl, Shift and then
F1 buttons on the Select Key form. If you want a Shortcutter button to act like
the PC's Alt, Shift or Ctrl modifiers, you can hit these buttons on the form
and then click Done. With
Key
- This sends a single keystroke to the PC. Selecting this action pops up the
Select Key form which contains all the PC's keys, including the function keys.
Note that the modifiers like Alt, Ctrl and Shift are available as well. To send
Ctrl-Shift-F1 from a Shortcutter button, simply select the Ctrl, Shift and then
F1 buttons on the Select Key form. If you want a Shortcutter button to act like
the PC's Alt, Shift or Ctrl modifiers, you can hit these buttons on the form
and then click Done. With 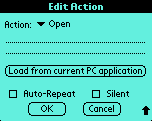 Open
- This tells the PC to open an application or any file or URL. If the application
is already running, however, the Open action will switch to it instead of opening
another copy. [This is new in version 5.] You can type in the name of a file
or URL, and the PC will open it with the appropriate application. Menu items
for Cut, Copy and Paste are available during type-in so you can transfer text
from other Palm applications. If you have the Pebbles RemoteClipHack running,
then you can select a file on the PC (for example in the Windows Explorer or
an icon in the My Computer windows), use the Copy menu command on the PC, and
then Paste into the Open field in Shortcutter on the Palm and the full filename
of that file will appear in the field. The button "Load from current PC
application" tries to figure out which application is at the front on the
PC, and find the ".exe" file for that application, and load its full
file name into the field. A special Open action is to use the devicectl.exe
file to control X-10 devices as explained in
Open
- This tells the PC to open an application or any file or URL. If the application
is already running, however, the Open action will switch to it instead of opening
another copy. [This is new in version 5.] You can type in the name of a file
or URL, and the PC will open it with the appropriate application. Menu items
for Cut, Copy and Paste are available during type-in so you can transfer text
from other Palm applications. If you have the Pebbles RemoteClipHack running,
then you can select a file on the PC (for example in the Windows Explorer or
an icon in the My Computer windows), use the Copy menu command on the PC, and
then Paste into the Open field in Shortcutter on the Palm and the full filename
of that file will appear in the field. The button "Load from current PC
application" tries to figure out which application is at the front on the
PC, and find the ".exe" file for that application, and load its full
file name into the field. A special Open action is to use the devicectl.exe
file to control X-10 devices as explained in 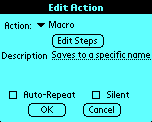 Version
4 of Shortcutter introduced support for "macros", which are simply
a series of actions. Unlike macros in some other systems, in Shortcutter, you
cannot record the actions by example, but rather you have to specify each step
using the regular action specification dialog box described above.
Version
4 of Shortcutter introduced support for "macros", which are simply
a series of actions. Unlike macros in some other systems, in Shortcutter, you
cannot record the actions by example, but rather you have to specify each step
using the regular action specification dialog box described above.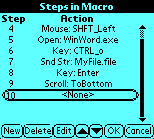 The
screen for editing the macro steps is shown at right. It will initially come
up empty (with no steps). Use the "New" button to add a new step to
the macro. That step will then be selected (the picture shows step 10 selected).
If there is more than one step, you can tap on a different step to select it
instead. Hitting "New" when a step is selected, will create the new
step directly after the selected step, and if nothing is selected, then the
new step goes at the end.
The
screen for editing the macro steps is shown at right. It will initially come
up empty (with no steps). Use the "New" button to add a new step to
the macro. That step will then be selected (the picture shows step 10 selected).
If there is more than one step, you can tap on a different step to select it
instead. Hitting "New" when a step is selected, will create the new
step directly after the selected step, and if nothing is selected, then the
new step goes at the end.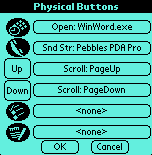 You
can assign actions to the six hardware buttons on the Palm. Using the "Edit
/ App Buttons Actions" menu item, a form pops up with which you can assign
an action to the DateBook, Address Book, ToDo List, and Memo buttons, and the
Scroll Up and Scroll Down buttons in the center. If the application buttons
have an action assigned to them, then they perform that action when in run mode.
If they have no action: "<none>" assigned, then they perform
their usual action (switching to the appropriate application). Note that the
assignments are global and do not change if you change panels. The actions for
the hard buttons are stored in a separate Palm database from all of the panel
actions, called ShortCutter__HARDBUTTONS.PDB, which you can also share (see
the
You
can assign actions to the six hardware buttons on the Palm. Using the "Edit
/ App Buttons Actions" menu item, a form pops up with which you can assign
an action to the DateBook, Address Book, ToDo List, and Memo buttons, and the
Scroll Up and Scroll Down buttons in the center. If the application buttons
have an action assigned to them, then they perform that action when in run mode.
If they have no action: "<none>" assigned, then they perform
their usual action (switching to the appropriate application). Note that the
assignments are global and do not change if you change panels. The actions for
the hard buttons are stored in a separate Palm database from all of the panel
actions, called ShortCutter__HARDBUTTONS.PDB, which you can also share (see
the  You
can have the Graffiti strokes done in the Graffiti area of the Palm or in a
Graffiti pad widget (see above) sent through to the application as if they were
typed on the PC's keyboard. This works in the same way as in RemoteCmd. This
is enabled by default, but you can turn it off using the dialog box (shown at
right) which is available from the menu command Edit / Graffiti Preferences
(in Edit mode). The same dialog box is also available from the Options / Global
Preferences (in either mode) dialog box.
You
can have the Graffiti strokes done in the Graffiti area of the Palm or in a
Graffiti pad widget (see above) sent through to the application as if they were
typed on the PC's keyboard. This works in the same way as in RemoteCmd. This
is enabled by default, but you can turn it off using the dialog box (shown at
right) which is available from the menu command Edit / Graffiti Preferences
(in Edit mode). The same dialog box is also available from the Options / Global
Preferences (in either mode) dialog box.